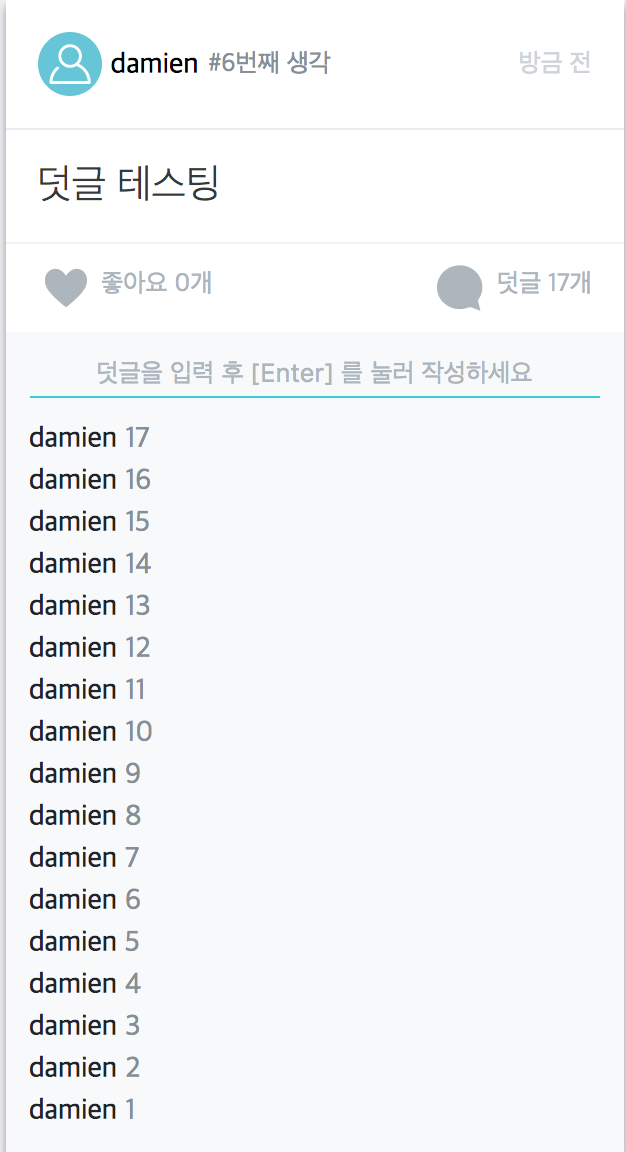
13-8. 덧글 렌더링하기
이제 덧글을 렌더링 할 차례입니다.

덧글의 생김새는 위와 같이 생겼습니다. 위 스타일대로, Comment 컴포넌트를 생성해주세요.
Comment 컴포넌트 만들기
src/components/Shared/PostList/Comment.js
import React from 'react';
import styled from 'styled-components';
import oc from 'open-color';

const CommentWrapper = styled.div`
    font-size: 0.9rem;
    & + & {
        margin-top: 0.25rem;
    }
`;

const User = styled.span`
    font-weight: 500;
    margin-right: 0.25rem;
    color: ${oc.gray[9]};
    text-decoration: none;
`;

const Text = styled.span`
    color: ${oc.gray[6]};
`;

const Comment = ({username, text}) => (
    <CommentWrapper>
        <User>{username}</User>
        <Text>{text}</Text>
    </CommentWrapper>
);

export default Comment;
CommentList 컴포넌트 만들기
그 다음에는 덧글 배열을 컴포넌트 배열로 변환해줄 CommentList 컴포넌트를 만들겠습니다.
나중에 덧글이 5개 이상이 되면, 5개씩 끊어서 보여주는 작업을, 여기에서 진행 할 것이기에 state 를 사용 할 수 있는 클래스형 컴포넌트로 선언을 하겠습니다.
src/components/Shared/PostList/CommentList.js
import React, { Component } from 'react';
import styled from 'styled-components';
import oc from 'open-color';
import Comment from './Comment';

const CommentListwrapper = styled.div`
    margin-top: 0.75rem;
`;

class CommentList extends Component {
    render() {

        const { comments } = this.props;
        if (comments.size === 0) return null; // 덧글이 비어있다면 아무것도 렌더링하지 않습니다.

        const commentList = comments.map(
            (comment) => (
                <Comment {...comment.toJS()} key={comment.get('_id')}/>
            )
        );

        return (
            <CommentListwrapper>
                {commentList}
            </CommentListwrapper>
        );
    }
}

export default CommentList;
CommentBlockContainer 에서 comments 전달해주기
props 에서 전달받은 posts 의 comments 를 CommentBlock 에 전달하세요.
src/containers/Shared/PostList/CommentBlockContainer.js
(...)
    render() {
        const { status, post } = this.props;
        const { visible, value } = status ? status.toJS() : { }; // status 가 존재하지 않는 경우를 위한 예외 케이스
        const { handleChange, handleKeyPress } = this;

        if(!visible) return null; // visible 이 false 면 아무것도 렌더링하지 않기

        return (
            <CommentBlock
                value={value}
                onChange={handleChange}
                onKeyPress={handleKeyPress}
                comments={post.get('comments')}
            />
        );
    }
(...)
CommentBlock 에서 CommentList 렌더링
src/components/PostList/CommentBlock.js
import React from 'react';
import styled from 'styled-components';
import oc from 'open-color';
import CommentList from './CommentList';

(...)

const CommentBlock = ({onChange, onKeyPress, value, comments}) => (
    <Wrapper>
        <InputWrapper>
            <Input
                value={value}
                onChange={onChange}
                onKeyPress={onKeyPress}
                placeholder="덧글을 입력 후 [Enter] 를 눌러 작성하세요"/>
            <CommentList comments={comments}/>
        </InputWrapper>
    </Wrapper>
);

export default CommentBlock;
Post 에서 PostFooter 로 comments 전달
덧글의 수가 제대로 나타나도록, comments 값을 PostFooter 에 전달하세요.
src/components/PostList/Post.js
(...)
const Post = ({post, onToggleLike, onCommentClick}) =>{
    const {
        _id,
        count,
        username,
        content,
        likesCount,
        liked,
        createdAt,
        comments
    } = post.toJS();

    const toggleLike = () => onToggleLike({
        postId: _id,
        liked
    });

    const commentClick = () => onCommentClick(_id);

    return (
        <Wrapper>
            <PostHead>
                <UserThumbnail image={`/api/users/${username}/thumbnail`}/>
                <Username>{username}</Username>
                <Count>#{count}번째 생각</Count>
                <Time><TimeAgo date={createdAt} formatter={formatter}/></Time>
            </PostHead>
            <Content>
                {content}
            </Content>
            <PostFooter
                likesCount={likesCount}
                liked={liked}
                onToggleLike={toggleLike}
                onCommentClick={commentClick}
                comments={comments}
            />
            <CommentBlockContainer post={post}/>
        </Wrapper>
    )
}

export default Post;
여기까지 코드 수정을 하고 나면 화면에 덧글이 잘 렌더링 될 것입니다. 하지만 덧글의 갯수가 많아지면 카드가 너무 길어지겠지요.

다음 섹션에서는, 덧글을 5개씩 끊어서 보여주는 더보기 기능을 구현해보겠습니다.